This section describes how to create a group. At a high level, creating a group involves first creating the first node standalone, then creating subsequent nodes referencing the first node so the nodes can introduce themselves and gradually the group is built up.
A group is created through either Web Management or the REST API or the initial configuration (Appendix H, BDB HA initial configuration illustrates how to use initial configuration for BDB HA group creation). These instructions presume you are using Web Management. To illustrate the example it builds the group illustrated in figure Figure 10.1, “3-node group deployed across three Brokers.”
Install a Broker on each machine that will be used to host the group. As messaging clients will need to be able to connect to and authentication to all Brokers, it usually makes sense to choose a common authentication mechanism e.g. Simple LDAP Authentication, External with SSL client authentication or Kerberos.
Select one Broker instance to host the first node instance. This choice is an arbitrary one. The node is special only whilst creating group. Once creation is complete, all nodes will be considered equal.
Click the
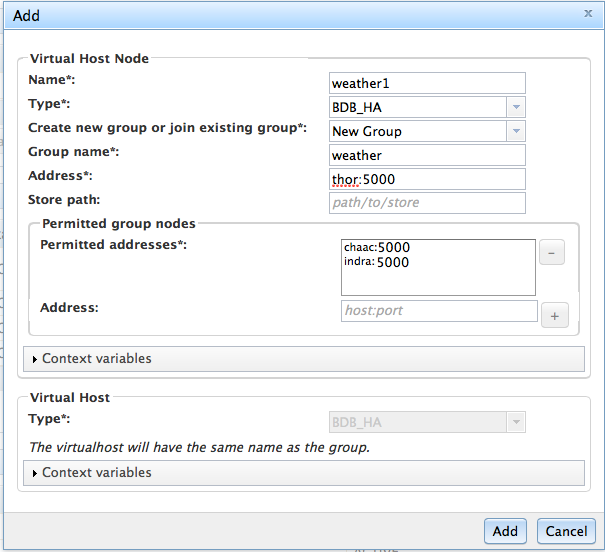
Addbutton on the Virtualhost Panel on the Broker tab.Give the Virtualhost node a unique name e.g.
weather1. The name must be unique within the group and unique to that Broker. It is best if the node names are chosen from a different nomenclature than the machine names themselves.Choose
BDB_HAand selectNew groupGive the group a name e.g.
weather. The group name must be unique and will be the name also given to the virtualhost, so this is the name the messaging clients will use in their connection url.Give the address of this node. This is an address on this node's host that will be used for replication purposes. The hostname must be resolvable by all the other nodes in the group. This is separate from the address used by messaging clients to connect to the Broker. It is usually best to choose a symbolic name, rather than an IP address.
Now add the node addresses of all the other nodes that will form the group. In our example we are building a three node group so we give the node addresses of
chaac:5000andindra:5000.Click Add to create the node. The virtualhost node will be created with the virtualhost. As there is only one node at this stage, the role will be master.
Now move to the second Broker to be the group. Click the
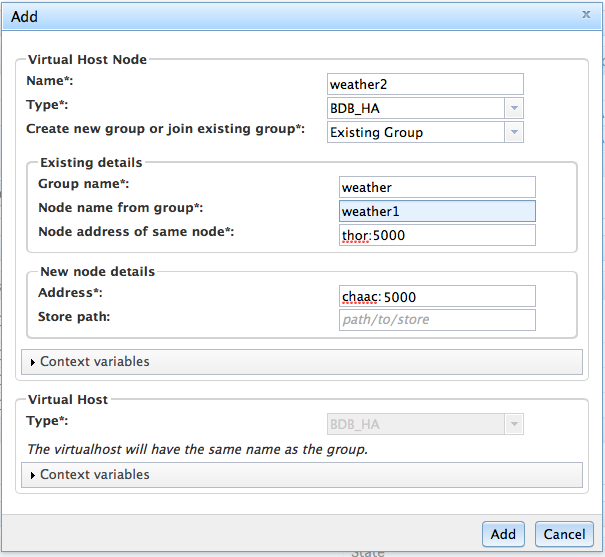
Addbutton on the Virtualhost Panel on the Broker tab of the second Broker.Give the Virtualhost node a unique name e.g.
weather2.Choose
BDB_HAand chooseExisting groupGive the details of the existing node. Following our example, specify
weather,weather1andthor:5000Give the address of this node.
Click Add to create the node. The node will use the existing details to contact it and introduce itself into the group. At this stage, the group will have two nodes, with the second node in the replica role.
Repeat these steps until you have added all the nodes to the group.
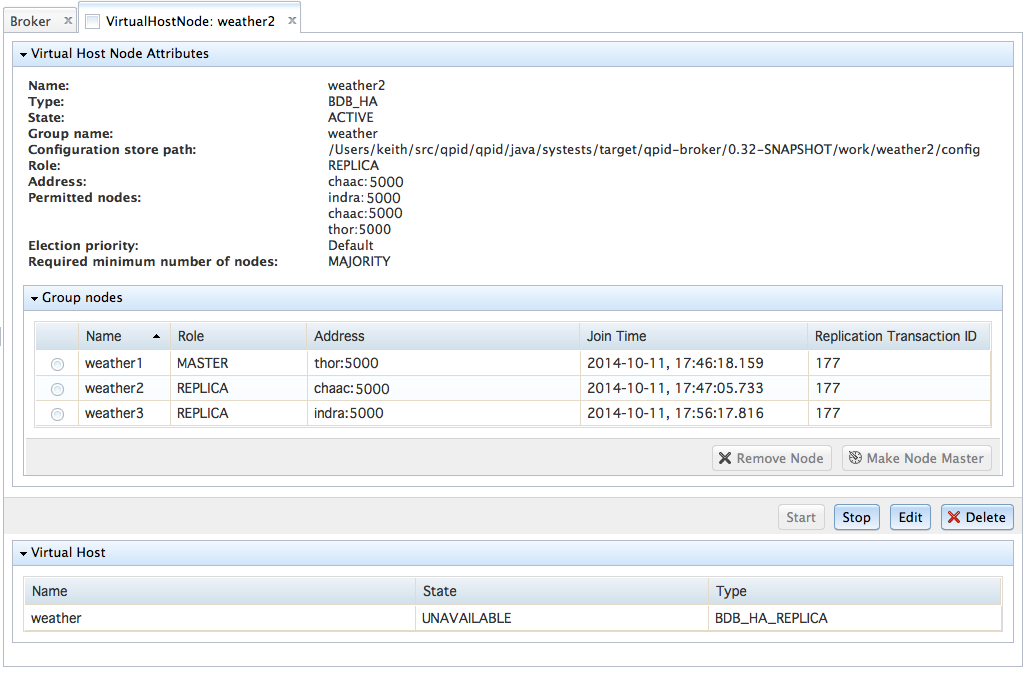
The group is now formed and is ready for us. Looking at the virtualhost node of any of the nodes shows a complete view of the whole group.
Apache Qpid, Messaging built on AMQP; Copyright © 2015 The Apache Software Foundation; Licensed under the Apache License, Version 2.0; Apache Qpid, Qpid, Qpid Proton, Proton, Apache, the Apache feather logo, and the Apache Qpid project logo are trademarks of The Apache Software Foundation; All other marks mentioned may be trademarks or registered trademarks of their respective owners


